BlinkStick / La visu facile et en couleur de vos status domo
Publié : 02 déc. 2016, 23:29
Bonjour à tous,
J’ai bossé ce soir sur la mise en place d’un blinkstick sur mon installation domoticz basée sur un domoticz v3.5877 sur un Rasp PI3 avec Pi Drive. 1h30 de boulot en cherchant un peu !
Pour résumer, l’objectif est d’intégrer une bande de led pour remonter des notifications facilement, visible d'un simple coup d'oeil
https://blinkstick.com/
J’ai basé mon installation sur le blinkstick Strip, pour disposer de plusieurs leds sur le même afficheur
https://blinkstick.com/products/blinkstick-strip pour 18£
J’y ai personnellement ajouté le capot (Enclosure Features) 4£ (Imprimable en 3D avec une imprimante si vous en disposez d’une.)
Pour information, commande passée au Royaume Uni, réception en 4 jours sous enveloppe protégée
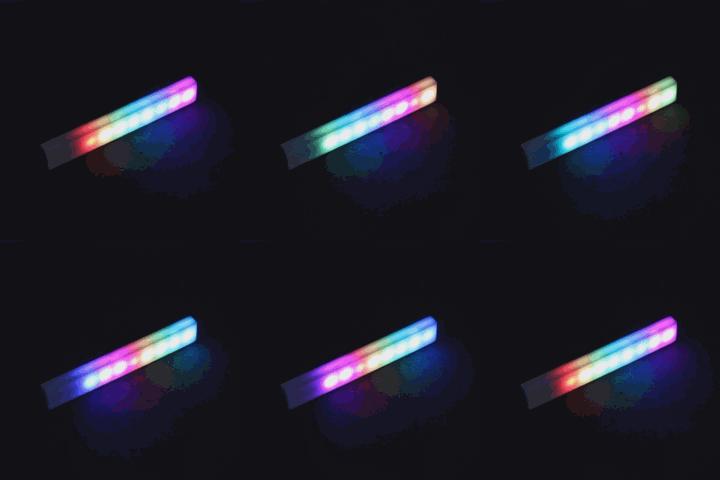
Voilà à quoi ressemble le strip, avec son boitier
Préparation de l’installation sur le Pi3
La ref Blinkstink est là : https://www.blinkstick.com/help/control
Prérequis
• Python
• BlinkStick pip module
Je vous laisse le soin d’installer python dans sa dernière version. En général, il est déjà installé sur la plateforme Pi
Pour l’installation du pip module, voici la procédure
Install pip (Python package management software):
Il vous faut ensuite installer le package python pour le blinkstick
Une fois le package sur le PI, il reste à l’installer avec la commande pip install blinkstick
Pour lancer la commande de test, il est possible de lancer la commande :
Sur mon installation, j’ai eu une erreur de type « is_kernel_driver_active ». Pour corriger le problème, j’ai modifier le linux en conséquence
Pour certains, il semble que l’on soit amené à upgrader la version de pyusb
Pour relancer le test
Ca doit fonctionner 
Il reste une problématique, le fait qu’il faille avoir des droits suffisants pour pouvoir lancer la commande blink sans le sudo
Sinon, l’erreur rencontrée est :
Pour modifier ça, on saisit la commande suivante :
un petit reboot, et on peut relancer le test une dernière fois, mais sans les droits admin
Pour la suite, il ne reste plus qu'à aller créer quelques scripts pythons. Mais j'ai d'ores et déja une solution assez rapide à implémenter.
Dans les scripts LUA, vous allez pouvoir demander au blink d'afficher des couleurs particulières.
j'ai implémenté ce soir l'affichage de mon status d'alarme.
L'alarme est mise, ça clignote rouge,
Elle n'est pas mise, ça cligote vert !
J'ai aussi lancé l'affichage de couleur pour le fonctionnement de mes radiateurs.
Mode éco -> Bleu
Mode Confort avec chauffage arrêté -> Vert
Mode Confort avec chauffage actif -> Rouge
Evidemment, on peut faire bien d'autres couleurs, du cyan au rose, en passant par le jaune et le violet !!!
Tout un choix pour afficher vos stats en un clin d'oeil.
Si certains sont prêts veulent des infos, n'hésitez pas
ƒ
J’ai bossé ce soir sur la mise en place d’un blinkstick sur mon installation domoticz basée sur un domoticz v3.5877 sur un Rasp PI3 avec Pi Drive. 1h30 de boulot en cherchant un peu !
Pour résumer, l’objectif est d’intégrer une bande de led pour remonter des notifications facilement, visible d'un simple coup d'oeil
https://blinkstick.com/
J’ai basé mon installation sur le blinkstick Strip, pour disposer de plusieurs leds sur le même afficheur
https://blinkstick.com/products/blinkstick-strip pour 18£
J’y ai personnellement ajouté le capot (Enclosure Features) 4£ (Imprimable en 3D avec une imprimante si vous en disposez d’une.)
Pour information, commande passée au Royaume Uni, réception en 4 jours sous enveloppe protégée
Voilà à quoi ressemble le strip, avec son boitier
Préparation de l’installation sur le Pi3
La ref Blinkstink est là : https://www.blinkstick.com/help/control
Prérequis
• Python
• BlinkStick pip module
Je vous laisse le soin d’installer python dans sa dernière version. En général, il est déjà installé sur la plateforme Pi
Pour l’installation du pip module, voici la procédure
Install pip (Python package management software):
Code : Tout sélectionner
sudo apt-get install python-pip
Reading package lists... Done
Building dependency tree
Reading state information... Done
The following extra packages will be installed:
  python-colorama python-distlib python-html5lib python-setuptools
Suggested packages:
  python-genshi python-lxml
Recommended packages:
  build-essential python-dev-all python-wheel
The following NEW packages will be installed:
  python-colorama python-distlib python-html5lib python-pip python-setuptools
0 upgraded, 5 newly installed, 0 to remove and 4 not upgraded.
Need to get 574 kB of archives.
After this operation, 2470 kB of additional disk space will be used.
Do you want to continue? [Y/n]
Get:1 http://ftp.debian.org/debian/ jessie/main python-colorama all 0.3.2-1 [20.3 kB]
Get:2 http://ftp.debian.org/debian/ jessie/main python-distlib all 0.1.9-1 [113 kB]
Get:3 http://ftp.debian.org/debian/ jessie/main python-html5lib all 0.999-3 [84.0 kB]
Get:4 http://ftp.debian.org/debian/ jessie/main python-setuptools all 5.5.1-1 [242 kB]
Get:5 http://ftp.debian.org/debian/ jessie/main python-pip all 1.5.6-5 [114 kB]
Fetched 574 kB in 2s (254 kB/s)
Selecting previously unselected package python-colorama.
(Reading database ... 24572 files and directories currently installed.)
Preparing to unpack .../python-colorama_0.3.2-1_all.deb ...
Unpacking python-colorama (0.3.2-1) ...
Selecting previously unselected package python-distlib.
Preparing to unpack .../python-distlib_0.1.9-1_all.deb ...
Unpacking python-distlib (0.1.9-1) ...
Selecting previously unselected package python-html5lib.
Preparing to unpack .../python-html5lib_0.999-3_all.deb ...
Unpacking python-html5lib (0.999-3) ...
Selecting previously unselected package python-setuptools.
Preparing to unpack .../python-setuptools_5.5.1-1_all.deb ...
Unpacking python-setuptools (5.5.1-1) ...
Selecting previously unselected package python-pip.
Preparing to unpack .../python-pip_1.5.6-5_all.deb ...
Unpacking python-pip (1.5.6-5) ...
Setting up python-colorama (0.3.2-1) ...
Setting up python-distlib (0.1.9-1) ...
Setting up python-html5lib (0.999-3) ...
Setting up python-setuptools (5.5.1-1) ...
Setting up python-pip (1.5.6-5) ...
Il vous faut ensuite installer le package python pour le blinkstick
Code : Tout sélectionner
https://github.com/arvydas/blinkstick-pythonCode : Tout sélectionner
pi@osmc:/tmp/blinkstick$ tar xvf blinkstick.tar
.gitignore
bin/
bin/blinkstick
blinkstick/
blinkstick/blinkstick.py
blinkstick/_version.py
blinkstick/__init__.py
CHANGES.txt
LICENSE.txt
MANIFEST
MANIFEST.in
README.rst
setup.pyCode : Tout sélectionner
pi@osmc:/tmp/blinkstick$ sudo pip install blinkstick
[sudo] password for pi:
Downloading/unpacking blinkstick
  Downloading BlinkStick-1.1.8.tar.gz
  Running setup.py (path:/tmp/pip-build-ZkYlMW/blinkstick/setup.py) egg_info for                                                                                                                                package blinkstick

Downloading/unpacking pyusb==1.0.0b1 (from blinkstick)
  Downloading pyusb-1.0.0b1.tar.gz (44kB): 44kB downloaded
  Running setup.py (path:/tmp/pip-build-ZkYlMW/pyusb/setup.py) egg_info for pack                                                                                                                               age pyusb

Installing collected packages: blinkstick, pyusb
  Running setup.py install for blinkstick
    changing mode of build/scripts-2.7/blinkstick from 644 to 755

    changing mode of /usr/local/bin/blinkstick to 755
  Running setup.py install for pyusb

Successfully installed blinkstick pyusb
Cleaning up...Code : Tout sélectionner
sudo blinkstick --pulse redCode : Tout sélectionner
sudo pip uninstall -y pyusb
sudo pip install pyusb==1.0.0b1Code : Tout sélectionner
sudo apt-get upgrade libusb-1.0-0-devCode : Tout sélectionner
sudo blinkstick --pulse redIl reste une problématique, le fait qu’il faille avoir des droits suffisants pour pouvoir lancer la commande blink sans le sudo
Sinon, l’erreur rencontrée est :
Code : Tout sélectionner
usb.core.USBError: [Errno 13] Access denied (insufficient permissions)Code : Tout sélectionner
echo "SUBSYSTEM==\"usb\", ATTR{idVendor}==\"20a0\", ATTR{idProduct}==\"41e5\", MODE:=\"0666\"" | sudo tee /etc/udev/rules.d/85-blinkstick.rulesCode : Tout sélectionner
blinkstick --pulse redDans les scripts LUA, vous allez pouvoir demander au blink d'afficher des couleurs particulières.
j'ai implémenté ce soir l'affichage de mon status d'alarme.
L'alarme est mise, ça clignote rouge,
Elle n'est pas mise, ça cligote vert !
Code : Tout sélectionner
local script_label = "Notification"
local Etat_Alarme = otherdevices["Alarme"]

commandArray = {}

os.execute ("blinkstick --channel 0 --index 0 off")
-- os.execute ("blinkstick --channel 0 --index 1 black")

if (Etat_Alarme=="On") then
    print(script_label .. " : l'alarme est activée")
    os.execute ("blinkstick --channel 0 --index 0 red --brightness 50")
else
    print(script_label .. " : l'alarme n'est pas activée")
    os.execute ("blinkstick --channel 0 --index 0 green --brightness 50")
end

return commandArray
J'ai aussi lancé l'affichage de couleur pour le fonctionnement de mes radiateurs.
Mode éco -> Bleu
Mode Confort avec chauffage arrêté -> Vert
Mode Confort avec chauffage actif -> Rouge
Evidemment, on peut faire bien d'autres couleurs, du cyan au rose, en passant par le jaune et le violet !!!
Tout un choix pour afficher vos stats en un clin d'oeil.
Si certains sont prêts veulent des infos, n'hésitez pas
ƒ